
Origami is the ancient art of paper folding from Japan. This art form is a great activity for kids as it helps improve spatial perception, sequential and logical reasoning. We will look at some fun origami projects for kids below.
How are origami projects essential for all subjects?
Researches have found that origami can make lessons interesting while giving students the skills they need. These include,
Geometry
Origami has been found to strengthen several geometric concepts and formulas. By labelling an origami structure with length, width and height, students can learn the key components and ways to describe a shape.
Furthermore, origami can also be used to describe the area by applying the formula to a real-world structure.
Thinking Skills
Origami can improve spatial visualization skills. Such skills allow kids to comprehend and characterize the world around them.
Fractions
Origami can help teach kids the concept of fractions. You can use origami paper to fold and illustrate how much is needed to make a certain shape. For example, fold the paper into their to indicate 1/4 or four to indicate 1/4 of the whole shape. Furthermore, holding the paper in half, and then in half again and so on can help illustrate the meaning of infinity.
Problem Solving
To help build problem-solving skills, all one needs to do is to show kids a particular shape and ask them to come up with a way to make it.
Science
Origami is a great way to explain physics and chemistry concepts. A thin piece of paper is not strong, but if when folded like an accordion, it will be. Bridges are constructed using a similar concept. Additionally, origami can be used to explain the structure of several molecules.
Fun origami projects for kids of all ages
Fish
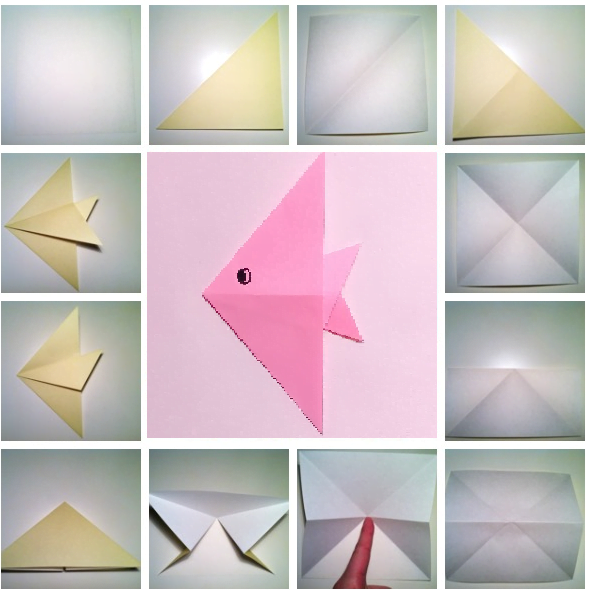
- Firstly, fold a square piece of paper in half diagonally.
- Then open and fold across the other edge.
- Open to reveal a criss-cross fold.
- Then fold the sheet of paper in half such that the four corners meat.
- Now, slightly press the centre to form a cone,
- Bring the right and left sides together such that the paper collapses into a triangle.
- Then rotate and fold one bottom to form a fin
- Fold the top over the bottom to make another fin
- Finally, turn over and glue googly eyes and draw a mouth.
Crown
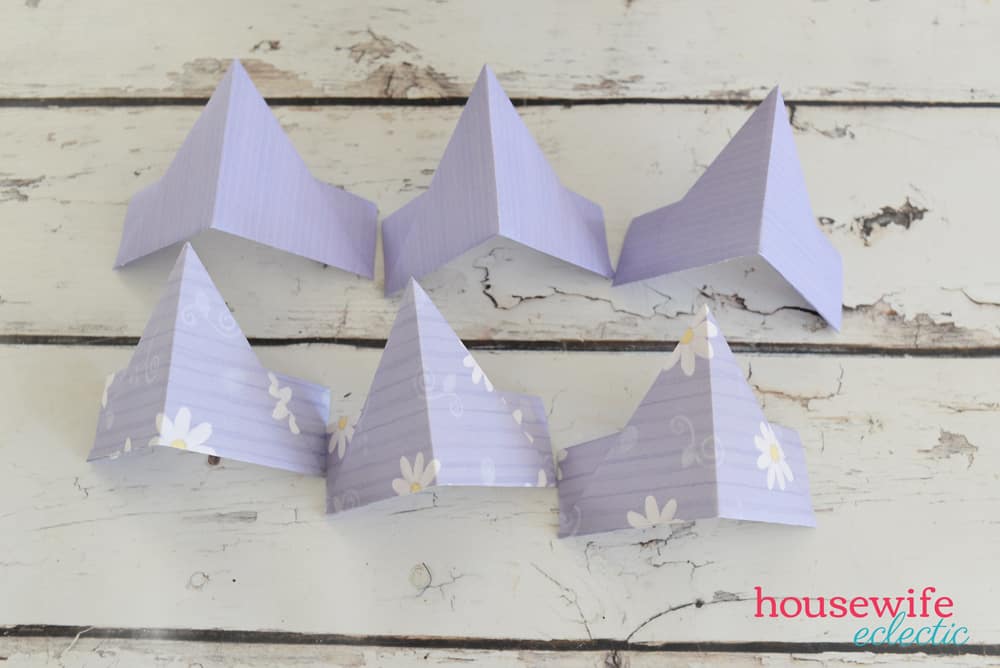
- Begin with a square sheet of paper
- Fold the paper in half so that the top and bottom meet. Then crease and unfold.
- Then, fold the paper so that both sides meet.
- Unfold the paper and you will notice a cross in the middle.
- Fold the top left and right corners down to the middle. Now you have a shape similar to a little house.
- Then, fold the bottom edge up to meet the middle horizontal line.
- Fold the rectangle up once more, along the middle horizontal line.
- Similarly, make 5 more triangles so that you have six triangles in total.
- Then, attach them together. Pull the tips of the triangles down and slide the rectangular area of one triangle into the rectangular area of the second one.
- Flip the triangles back along the crease line.
- Continue to connect all triangles in a similar way to form a complete circle.
- Use stickers, markers to decorate the crown.
Gift box
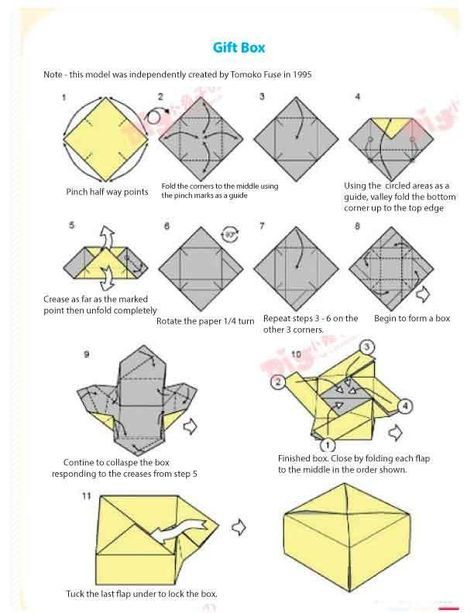
- Start by folding a square paper into quarters. Once opened you should have across. Then fold the four corners inward so they meet in the middle. Now, you have a diamond shape.
- Turn the diamond around so that the square side is up.
- Fold the opposite sides to meet in the middle. Then open out the folds on the right and left.
- Now fold the top and bottom edges towards the middle. Then fold the bottom corners inward and meet the upper edges. Repeat the same in the opposite direction.
- Open all the folds.
- Open up the top and bottom edges to make the walls of the box. Then open up the other ones and fold the pointy flaps in to secure the walls.
- Now your box is ready. Let’s make the lids. The steps till step two remain the same.
- Then fold the edges to the middle while leaving a small gap in the centre.
- Do the same on the other side.
- Now start decorating the box. You can use glitter, paint or stickers to do so. Here we have opted for a heart shame decoration.
Cat
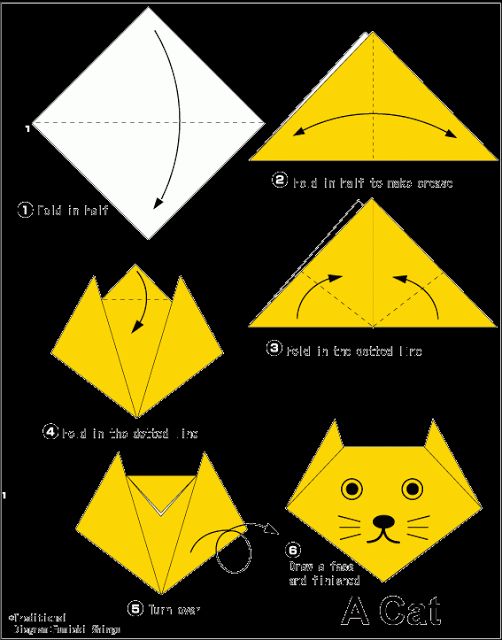
- Use a square piece of origami paper. You can easily get these in any craft store.
- Fold the square in half, to make one triangle.
- Then, carefully fold your piece in half again, and draw a small mark to indicate the halfway mark.
- Fold the point of the triangle down.
- Then, using, the halfway crease or mark that you made earlier, fold the sides up from the centre.
- Now, fold both sides up.
- Finally, turn over and decorate how you like. Your cat is ready.
Pencil
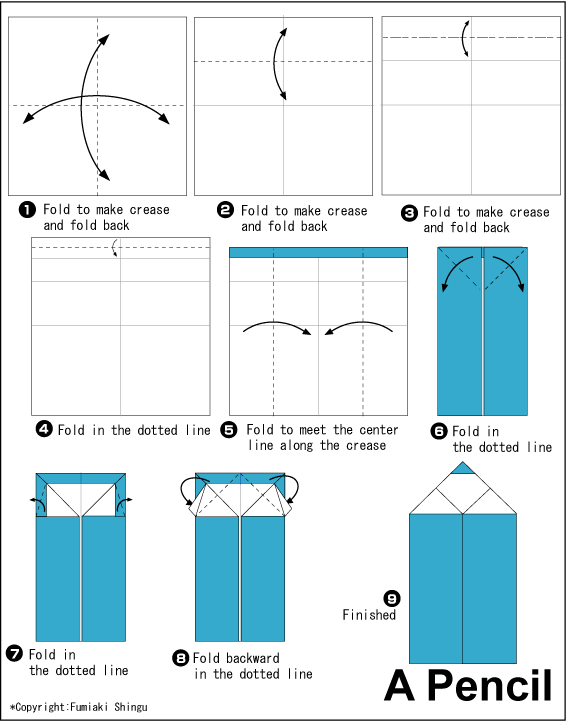
- Begin with a square piece of origami paper.
- Then fold the sheet in half such that the right and left edges touch. Unfold and fold it in half again, such that the top and bottom edges touch.
- Now fold the folded edger down and stop at the centre.
- Once again, fold the top edge down, and stop at the top crease. Unfold again.
- Then, create one more thing fold at the top edge. Do not unfold.
- Fold in the right and left edges to the middle crease.
- Spread out the top corners and fold them to the side
- Fold the little flap diagonally. Then, turn the figure over.
- Fold the top right and left corners to the middle.
- Finally, turn it over and you have a paper-pencil.
Conclusion
Origami is a fun and engaging art form for kids. Kids of all ages can create fun items out of origami paper. The above five origami projects are great beginner-friendly ones for kids of all ages. Podium updates many such tips and tricks for you to work with Origami.
Share with your friends


