
Drawing is something which calms and soothes the mind. It’s an addiction which takes you to a different plane. I am sure many of you have had difficulties while drawing a face. Either the nose is too long, the mouth too thin, the ears too big, cheeks aren’t proportionate. All of us face these difficulties while drawing a portrait. This does not just happen when we are at the learning stage, this happens and keep on happening forever. These are certain add-on’s we get with portrait drawing. In this blog by Podium School we will not just talk about how to draw a portrait; we will also show you that you are not alone in your troubles with Portrait drawing.
This blog basically is drawing portraits 101. We shall be talking on what goes in drawing a proportionate face, and how to get to that stage where we don’t make blunders while doing so. For drawing life-like portraits it is crucial to know how to draw facial features. Before we can draw an entire face, we need to understand how to draw the nose, mouth, ears, eyes, and cheeks individually. Once we know how to draw the individual features perfectly is when the entire face comes to life and becomes a work of art.
Drawing Facial Features
The Nose
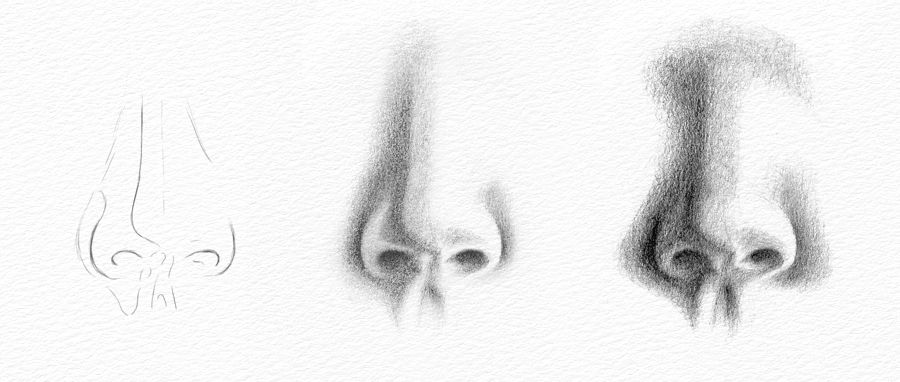
The nose is the most important feature in a face. Some people have a shirt nose, some long. The nose defines the entire structure of the face. If you get the nose wrong, you get the entire face wrong. However, the nose is the least complicated part of drawing a portrait.
You either need to draw a straight-on view nose or a profile view (sideways). In both cases we need to first draw the grid lines. Once drawn, we need to draw a sphere first and then move to the outer edges of the nose. Once we are sure of the shape and structure, we remove the grid lines. Now we have a nose that is accurate. Moving on to the shading now. We need to develop the light and dark patterns with a pencil or charcoal. Our work has not yet ended, we need to now blend it in. Use a stump or tortillon to blend the tones smooth. The trick is to use the dark tones behind the nose as shown in the picture to make the edges stand out. Lighting is crucial too. Use a dark background to make the feature stick out.
The Lips

Drawing lips can be a challenge, but it becomes much easier if we break the process into simpler steps. When studying a mouth, we notice that the upper lip is usually smaller/ thinner than the bottom one and it appears darker in shade compared to the bottom one.
Before starting the sketching process, we need to draw the grid lines with a mechanical pencil. Now we draw an outline of the lip. When you are sure of its accuracy, we move on to the defining part of it. But before we do, we need to erase the grid lines very carefully with an eraser. With a pencil apply the dark patterns to the lip. Make the upper lip darker than the lower one We do this because if you notice a face carefully, the upper lip seems to angle in while the bottom one angles out. After this we blend the tones smooth with a tortillon. Be sure to create the tones of the skin around the lips to make it look more realistic. Now for the final touch, use a kneaded eraser to lift the bright highlights of the lower lip to make it look moist.
A mouth becomes much more difficult to draw when there are teeth showing. We should never draw hard line between tooth since they touch, and a hard line would make them look separate by shoeing a dark space in between. Always shade your teeth, leaving them blank would make them look flat while they are dimensional. Additionally, as the teeth recede inside the mouth, we need to make them darker than the ones in front. The lips are the naughtiest features in the how to draw a portrait section.
The Eyes
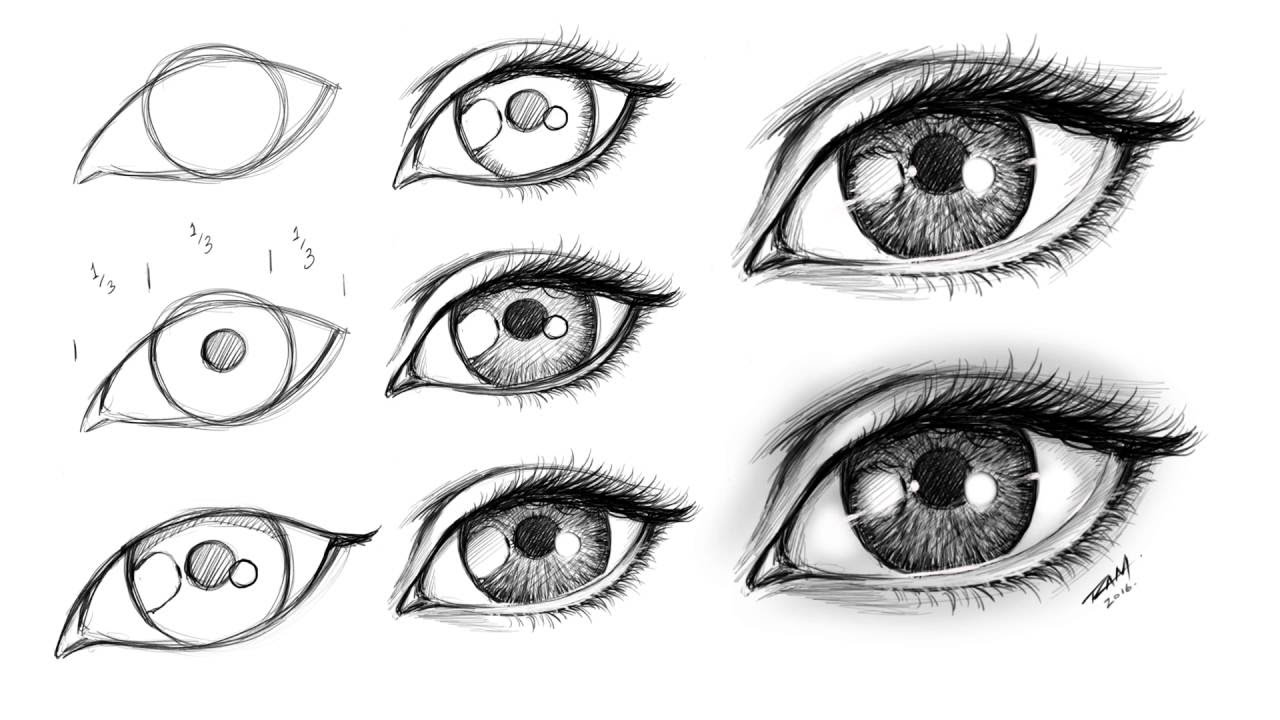
When it comes to the eye in how to draw a portrait, there are many components which come in to play. And all of them are equally important. As always, we begin by drawing the grid lines. Then we create the line drawing of the eye as always, followed by removing the grid lines once we are sure of the accuracy. The pupil is the darkest part of the eye and without a shade of doubt we can fill it in as dark and as smooth as possible. Moving on to the iris, we need to lay in the patterns. The pencil lines can resemble a starburst or wagon wheel spokes. The iris and the pupil would be perfect circles if the it is looking straight at you.
Now moving on to the little defining features, we need to leave an area in the pupil as well as the iris to catch light. This is a tiny sphere which is half in the iris and half in the pupil. The lower lids thickness, below the iris is very important. Never just draw a single line, there should be several lines and proper shading to give it dimension. Additionally, shade the white of the ye to make it look like a sphere. The lashes must be added with very quick strokes which taper at the ends. Make the lashes grow in clumps, and not all along in a single row. The same must be done for the lower lid, only the lashes would be shorter than on the upper lid. Finally, blend in everything smooth with a tortillon.
The Ears
Ears are made up of various and strange shapes and are quite difficult to draw. I think we have reached the most difficult feature in how to draw a portrait. We don’t pay much attention to it. Since in a portrait it pretty much stays hidden. But it would be a good idea to keep it in practice. We need to have all the features in place to have a convincing and realistic portrait in out kitty.
There are certain points we need to keep in mind while drawing an ear. The outer layer always overlaps the inner one, we need to shadow the area beneath where the overlapping happens. the skin of an ear is a little different from others. it always appears a little oily, so shading is very important. The highlights need to appear bright. The ear lobe should represent a sphere. While drawing an ear we need to keep shading instead of outlining or drawing hard lines.
Putting Everything Together
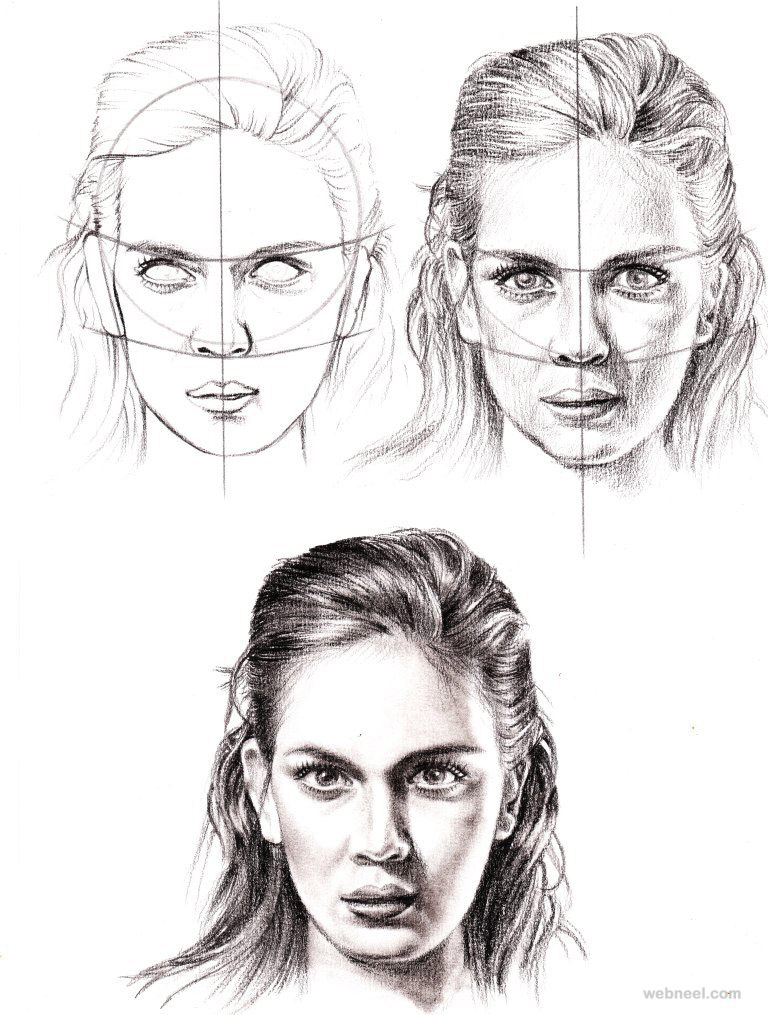
The final piece is putting all of them together to create a portrait. the strategy is to always start with the eyes. Once done, move on to the nose. The next is the mouth. Now you have a triangle of features. When drawing hair, one thing must be kept in mind. Always apply your pencil strokes going in the same direction as the hair growth. Always draw grid lines before you start your drawing. Don’t forget to practice. We at Podium School hope now you have the answer to how to draw a portrait.
Share with your friends


