
What is Zugzwang?
Imagine this, you think you will win this chess match but suddenly you see you’ve been trapped by your opponent in a manner that the next move you make will be disadvantageous to you. Sounds terrible, right? This situation is called zugzwang, it is a German word that means “compulsion to move”. They are relatively rare today but you can often spot them in endgames because the number of pieces and the possible moves is reduced.
3 types of Zugzwang
There are three types of zugzwang, the first one being, each side would benefit if it were their turn to move. The second being, one player would be at a disadvantage if it were their turn to move. Most writers from the chess literature consider the second type to be zugzwang. The third type is when both the players would be at a disadvantage if it were their turn to move. This one is commonly referred to as reciprocal zugzwang or mutual zugzwang.
You can even put your opponent in zugzwang by using the triangulation technique, which generally occurs in king and pawn endgames. You could also employ the Philidor position to triangulate your opponent.
It is extremely difficult to explain a concept like this in words. Now, if you’ve watched the Queen’s Gambit and know-how Beth Harmon went over her games in the orphanage at night before going off to sleep by visualizing it, we recommend that (minus the pills) or you could just sit with your chessboard and play out the moves illustrated here. We have illustrated an endgame example and The Immortal Zugzwang. Like we understood earlier, zugzwang generally can be found in endgames where the number of possibilities is slim, in the match of Immortal Zugzwang, we see zugzwang occurring in the middle-game. Shall we begin? Let’s look.
Figure 1 is the first example we look at.
What are the possible moves for white?
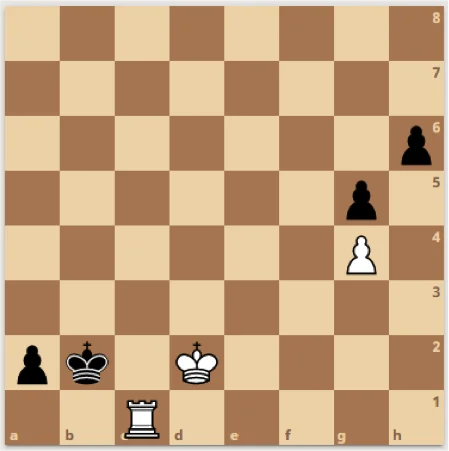
The winning moves would be:
- Rook to a1
- Rook to c2+
Moves that would draw the match would be:
- Rook to d1
- Rook to e1
- Rook to f1
- Rook to g1
- Rook to h1
- Rook to c5
- Rook to c6
- Rook to c7
- Rook to c8
- King to d1
Lastly, the moves that will turn the games against you are:
- Rook to b1+
- Rook to c3
- Rook to c4
- King to e1
- King to e2
- King to d3
- King to e3
We will analyse the first move that will put black in zugzwang. When rook is played to a1 all the moves black has been disadvantageous to him. Let’s see what moves black can play in this situation:
- King to a3
- King to b3
- Pawn to h5
- King captures rook at a1.
Normally, any sane person would look at capturing but what else could you do? You do not have a lot of choices. So when King captures rook at a1 white has two winning moves, either move the king to c1 or c2, either way, black’s situation is not improving unless you look at other options and give your game up so soon, especially when you’re winning.
So, we move the white king to c1 or c2, black will only have one move and that moves the pawn to h5, which will be captured by the white pawn in g4. The black pawn will move to g4 and the white rook will move to h6 or you could move the white king to c2.
Currently, the board looks something like this in Figure 2.
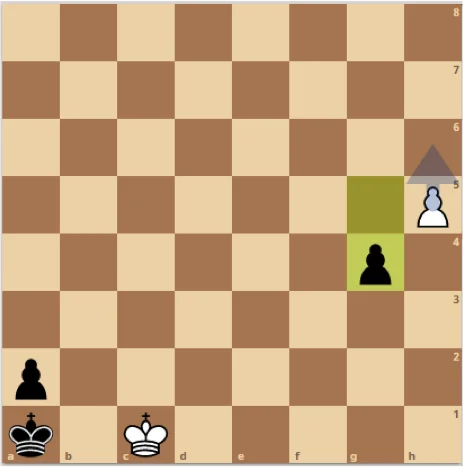
White pawn moves up to h8 and becomes queen. Black is now checkmate.
Now, let us take a look at “The Immortal Zugzwang Game” played between Aron Nimzowitch (Black) and Friedrich Sämisch (White). This game was played in the year 1923 in Copenhagen. I am sure you’re wondering why the name Immortal Zugzwang, is because it is one of the rare instances of zugzwang occurring in the middle game. Let us analyse the full game below:
The match opened with Queen’s Indian Defense:
- d4 Nf6
- c4 e6
- Nf3 b6
- G3 Bb7
- Bg2 Be7
- Nc3 0-0
- 0-0 d5
- Ne5 c6
- Cxd5 cxd5
- Bf4 a6
- Rc1 b5
- Qb3 Nc6
- Nxc6 Bxc6
- H3 Qd7
- Kh2 Nh5
- Bd2 f5
- Qd1 b4
- Nb1 Bb5
- Rg1 Bd6
- E4 fxe4
- Qxh5 Rxf2
- Qg5 Raf8
- Kh1 R8f5
- Qe3 Bd3
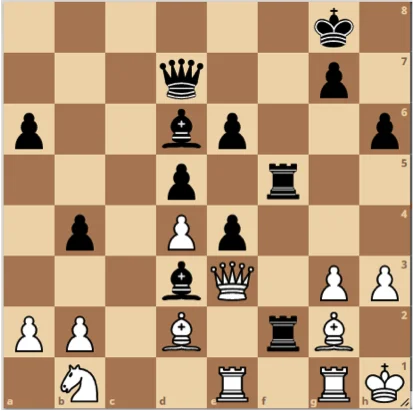
- Rce1 h6
The h6 move announces the immortal zugzwang position. This is the point where Friedrich Sämisch resigns because he realises he has no moves left anymore and all those moves that he could possibly play would eventually lead to his loss. There were many mistakes that Friedrich Sämisch made in this match and he even admits that some moves weren’t very wise. He could have played the game differently. Let us understand how the game would’ve progressed for white if white made a move.
The knight in b2 couldn’t move anywhere, a3 is not a possible move for it. It could go to d2 but the bishop at d2 would open up the threat of capture for the bishop at d3 for knight’s capture.
Even if Sämisch moved his pawn a2 to a3 then the pawn at a6 moves to a5 threatening the pawn.
Now if the pawn at g3 attacked the rook at f5 then the rook would come down to f3, trapping the queen. King to h2 would lead the same move as the previous one, trapping the queen. Hence, there are not many moves left for white to play and to avoid any more hardship Sämisch resigned from the match in this position as illustrated in Figure 3.
To end this article with a powerful quote, I’d like to share David Bronstein’s wise words that are etched in my head, “The most powerful weapon in chess is to have the next move.” This quote resonates with all aspects of life, not just in the game of chess.
Share with your friends


