
Tying a tie is generally a simple task. However, people often do not match the proper knot to the right occasion. Hence, we have listed 11 different tie knots for various occasions to make things simpler for you.

How to tie a Common Knot Tie?
The Common Knot, also known as the Four in Hand Knot or the Schoolboy Knot, is the first tie knot you learnt. It is a narrow, more discrete, and asymmetrical tie knot that looks best with a conventional button-down dress shirt.
While these tie knots may be worn by anyone, it looks especially good on men with shorter necks because the knot is thin and its extended shape makes the neck appear longer.
Step by step instrucitons to tie a Common Knot:
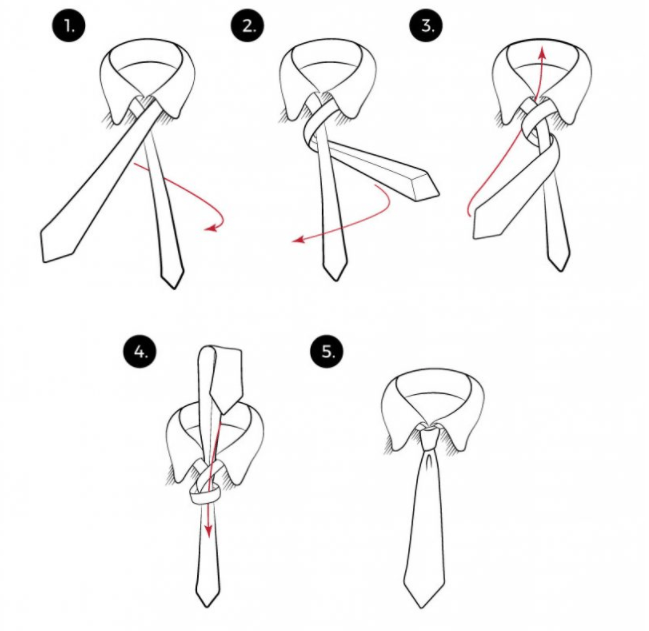
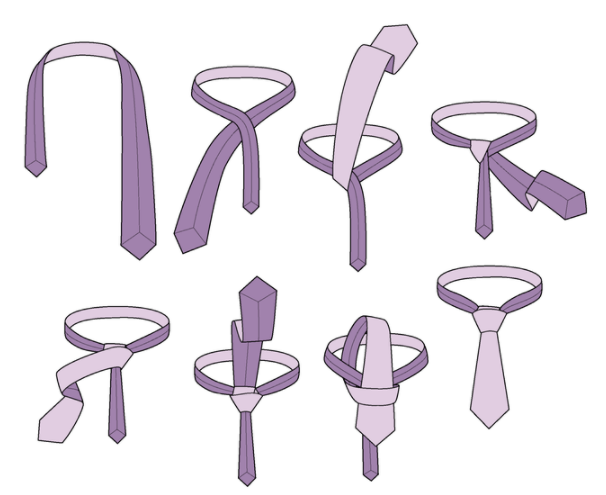
- First, begin with your necktie’s wide end on the right, extending about 12 inches below the narrow end on the left.
- Then, cross the broad end over the thin end.
- Wrap the broad end of the tie around the narrow end.
- Following this, take the broad end and pull it up and through the loop around your neck. With your index finger, lightly hold the front of the knot and pull the broad end down through the front loop.
- Finally, remove your finger and gently tighten the knot to the collar by grasping the narrow end and moving the knot up.
10 other fun ways to tie a tie: step by step instructions
Pratt Knot
The Pratt Knot, also known as the Shelby Knot, is a neat and broad tie knot. The knot goes well with any dress shirt and slightly broader neckties made of light to medium fibres.
Step by step instructions to tie a Pratt Knot:
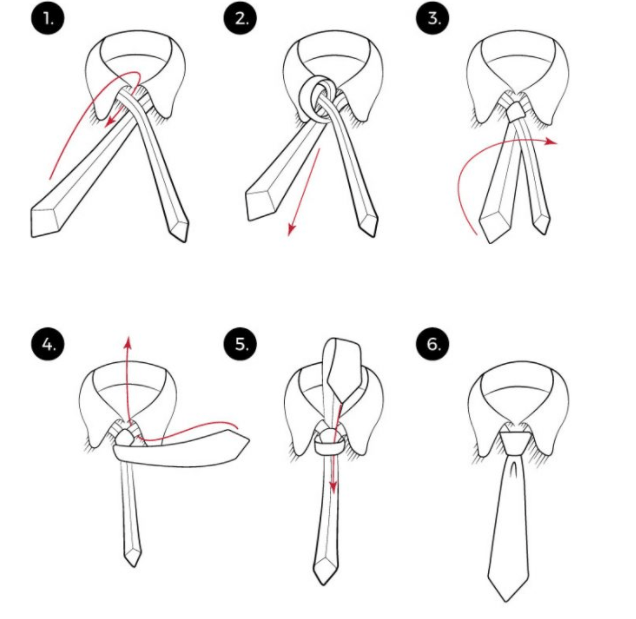
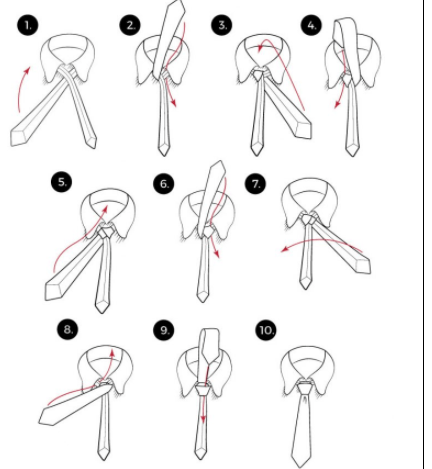
- Begin by turning the necktie inside out, broad end on the right, extending about 12 inches below the narrow end on the left.
- Then, take the wide end and cross it under the thin end.
- Continue to cross the wide end over and then, under the narrow end. Tighten the loop by pulling it down.
- Then, take the broad end to the right and pull the broad end up behind the loop
- Pull the broad end of the tie through the loop in front of the tie.
- Gently tighten the knot while squeezing both sides to create a dimple below the knot.
- Your Pratt Knot is ready.
Half Windsor
The Half Windsor tie knots are symmetrical, triangular tie knots that may be worn with any formal shirt. It looks best with broader neckties made of light to medium weight materials.
Step by step instructions to tie a Half Windsor tie knot:
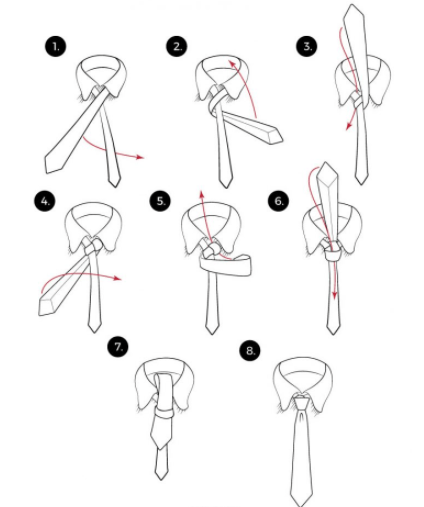
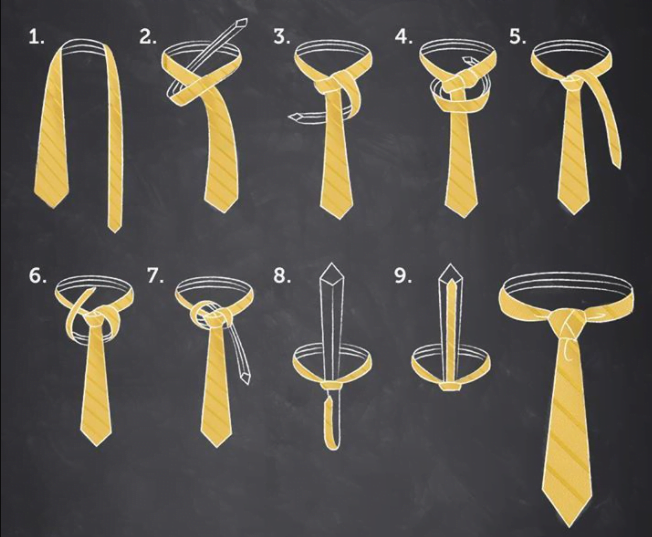
- Similar to the above tie knots, wrap the tie around your neck, leaving the broad end 12 inches lower than the thin end.
- Cross the broad end over the thin end and bring it around behind the narrow end.
- Then, with the broad end, pull it through the gap between the collar and the necktie.
- Next, take the wide end and wrap it around the tie’s narrow end. Pull the broad end through the gap between the collar and tie once again.
- Pull loosely enough to allow for a loop on top of the knot.
- Finally, pass the tie’s broad end through the loop on top of the knot and centre the knot between your collarbones.
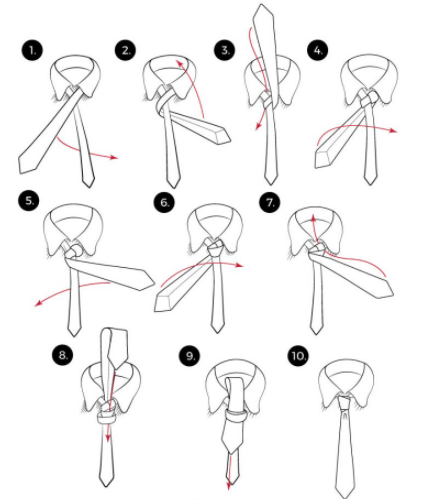
Windsor Knot
The Windsor Knot is a thick, broad, and triangular tie knot. As a result, it would be your preferred knot for presentations, job interviews, courtroom appearances, and so forth. It’s best suited for spread collar shirts and it is quite simple to tie this tie knot. Additionally, the knot suits men with longer necks because it shortens the perceived height of the neck.
Step by step instructions to tie a Windsor tie knot:
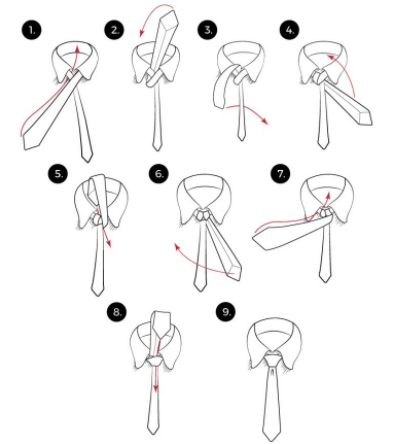
- Begin with your necktie’s wide end on the right, extending about 14 inches below the narrow end on the left. After that, cross the broad end over the thin end.
- Then, bring the broad end through the loop between your collar and tie. Return the broad end to its original position.
- Pull the broad end to the right and below the small end. The reverse side of the broad end of the tie should be visible.
- Pull the wide end of the tie through the loop between your tie and your neck.
- Pull the broad end down to tighten the covering.
- Then, take the broad end and wrap it around the small end so that the wide end’s front is visible again.
- Draw the broad end back up through the loop and bring it down through the knot in front of you.
- Using both hands, carefully tighten the knot and drag it up to the collar.
- Your Windsor knot is ready
Nicky Knot
The Nicky tie knot is a symmetrical knot that lies midway between the half-Windsor knots and Four in Hand knot. It is bigger than a Four in Hand knot but smaller than a half-Windsor. It is suitable for casual occasions and proms.
Step by step instructions to tie a Nicky tie knot
- Drape the necktie around your collar, with the thick end on your left, about two inches lower than you want the finished position to sit.
- Cross the thick end underneath the small end to form an X beneath your chin.
- Tuck the thick end down through the loop, and pull it out to the left of the thin end.
- Then flip in front of the loop around your collar.
- Bring the wide end horizontally across the front of the knot. Insert a finger beneath the horizontal band and bring the thick end below the loop around your collar.
- Tuck the thick end down through the horizontal loop you made earlier.
- Holding the knot with one hand and pushing on the narrow end of the tie with the other, adjust it as needed.
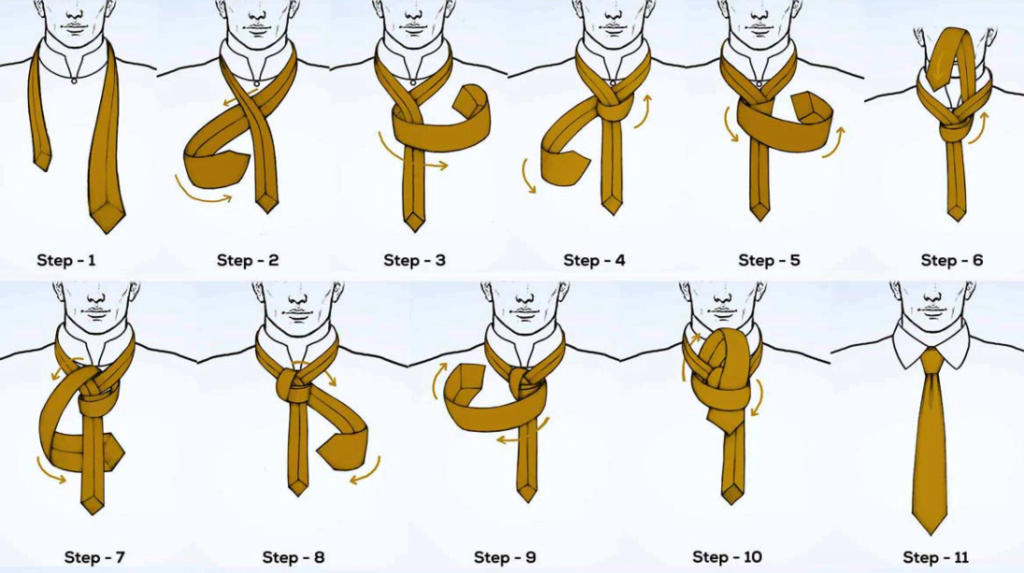
Balthus Knot
Balthus tie knots are highly suggested for any elegant events such as fine dining restaurants, theatre, and art activities.
Step by step instructions to tie a Balthus Knot:
- Wrap a long tie around your neck, such that the wide end is on the left. The wide end should reach the mid-thigh. On the other hand, the narrow end should hang at the centre of the chest.
- Cross the thin over the thick end.
- Then, bring the wide end forward, tuck it beneath the narrow end and cross the wide end behind it.
- Bring the wide end up in front and loop it over the narrow end again, this time on the left side.
- Tuck the wide end down and across, thus, ending behind and to the right of the narrow end.
- Then, flip the wide end upward and wrap it over the knot’s centre. Bring it behind the knot and cross it from right to left.
- Then, bring the thick end across the front of the knot horizontally, crossing from left to right and behind the knot.
- Leave some space in the horizontal pass you just made to tuck the wide end through.
- Adjust by gently pulling down on the narrow end while squeezing the knot with your other hand.
Cafe Knot
Popular among cafe-goers early in the 20th Century, Cafe tie knots are stunning, symmetrical and layered knots. It accessorizes well with your casual suit during social gatherings.
Step by step instructions to tie a Cafe Knot
- Wrap the necktie around your collar, such that the wide end is on your right, about a half-inch lower than where you want the finished tie to sit.
- Create an X by crossing the narrow end across the wide end. Then, behind the X, pull the wide end up through the loop you just produced.
- Then, flip the narrow end over the knot’s top.
- Bring the narrow end behind the knot from left to right. Then, bring it to end across the front, from right to left.
- Bring the narrow end behind the knot and up through the neck loop. This will result in a horizontal band running across the front of the knot.
- Flip the narrow end over the front of the knot and hang it down.
- Then, fold it slightly to the left of the wide end and behind the knot from left to right.
- Bring the narrow end up in front of the knot and towards your left shoulder.
- Tuck the narrow end behind the remainder of the knot and pull it to on the left side of the wide end through the loop around your collar.
- Tightly tuck the narrow end down and arrange the knot’s centre.
- Then, flip the wide end forward and up.
- Slip the narrow end through the single horizontal loop across the back of the knot with the end upward.
- Then, pull the narrow end of the tie all the way through the loop and tighten it up.
- Return the two ends of the knot to their original position.
- Finally, tighten the knot gently with one hand while tugging on the wide end with the other.
- Your Cafe Knot is now ready.
Eldredge Knot
Eldredge tie knots make a bold statement with their intricate design. Its novel design is perfect for casual settings like a cocktail party or dinner event.
Step by step instructions to tie an Eldredge Knot:
- Drape the tie around your neck, wide end on the right.
- Pinch the wide end of the tie to form a dimple, then cross the narrow horizontally in front of the wide end.
- Wrap the narrow end behind the cross-shape, horizontally crossing from right to left. Then, tuck the thin end of the string into the loop around your collar.
- Bring the narrow end across the wide end horizontally, and tuck the thin end up through the loop around your collar. Flip it over the top of the knot, diagonally downward from left to right.
- Pull it snugly down the right side of the knot to make a diagonal band.
- Wrap the narrow end around the knot’s back and up through the diagonal band. Pass it through and tighten it to form a diagonal band on both sides.
- Tuck the tie’s narrow end beneath the loop around your collar and pull it to the right of the knot.
- Wrap the wide end of the tie around your collar in a circle.
- Tuck the narrow end’s tip down and to the left, below the loop you made around your neck, and up through the loop you just made.
- Flip the narrow end over the top of the collar loop and tuck the remaining end out of sight.
- Tighten if necessary by pulling the wide end and adjusting each diagonal band to be about the same width.
Trinity Knot
The Trinity knot is a fashionable design based on the Trinity emblem. It is more difficult to tie than the Windsor and four-in-hand knots, however, it makes a stylish statement for formal gatherings.
Step by step instructions to tie a Trinity Knot:
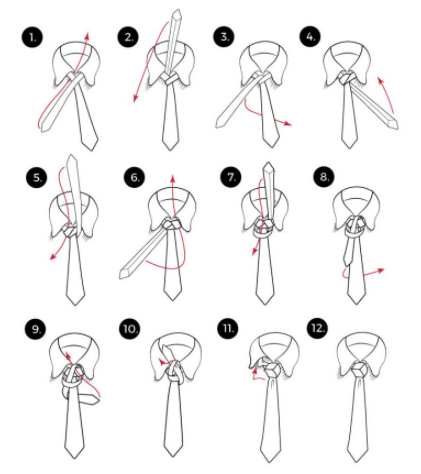
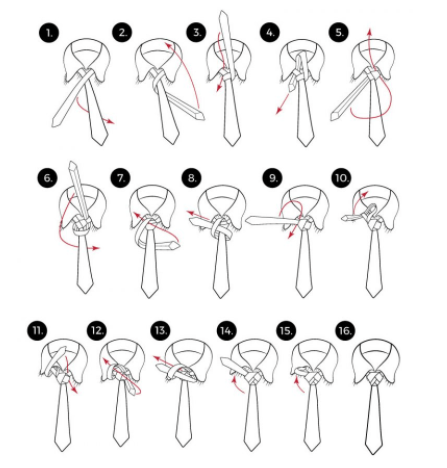
- Drape the necktie around your collar with the wide end hanging on your right.
- Tuck the narrow end beneath the loop around your neck and cross it diagonally in front of the thick end, forming an X. Return the narrow end to the top of the loop.
- Pass the narrow end behind the wide end horizontally and flip it over the top of the collar loop.
- Pass the narrow end down and out beneath the loop around your neck, on the far right side of the knot.
- Then, bring the narrow end over the front of the knot horizontally from right to left. Place a finger beneath the horizontal band that is formed as a result of this.
- Pass the narrow end up through the horizontal band and underneath the loop around your collar.
- Insert your finger beneath the narrow end just above the knot and wrap the narrow end around behind the wide end from right to left.
- Pass the narrow end over the loop around your collar and into the little vertical loop you made.
- Squeeze the narrow end through the vertical loop, angling diagonally upward to the right.
- Pull all the slack out of the knot and make any required adjustments to make the three visible folds the same size and angle. Finally, hide the narrow end behind the thick end.
- Your Trinity Knot is now ready.
Christensen Knot
This symmetrical, medium-sized tie knot is usually worn to business or social gatherings.
Step by step instructions to tie a Christensen Knot:
- Wrap the necktie over your collar, wide end to the left. This end should be four to six inches shorter than the desired finished length.
- Cross the wide end horizontally in front of the narrow end, from the left to the right.
- Bring the wide end horizontally around behind the narrow end from right to left and flip it in front of the collar loop. Then, tuck the end behind the collar loop and pull it on the right side of the thin end.
- Bring the wide end in front of the previous horizontal band. Place a finger beneath the new horizontal crossing.
- Wrap the wide end behind the knot from left to right. Bring the wide end across the front, directly on top of the horizontal fold. Maintain both horizontal bands by holding them slightly off the collar with a finger.
- Bring the wide end of the loop around your collar up below the loop.
- Pull through by tucking the wide end behind both horizontal crosses.
- Holding the knot with one hand, pull it into place. With the other hand, gently pull on the narrow end until the X shape of the knot is clearly seen.
Grantchester Knot
Grantchester tie knots are part of the “inside-out” knots. These knots are initially draped around the collar with its seam exposed instead of hidden. The completed knot conceals the seams by facing them toward each other, while the rest of the tie is covered by the collar. It is perfect for formal occasions like business or social gatherings.
Step by step instructions to tie a Grantchester Knot
- Drape the necktie around your collar, seam outward, and wide end to the left, 4-5 inches lower than your preferred ending position.
- Form an X by crossing the wide end below the thin end.
- Then, wrap the wide end horizontally from right to left across the front of the narrow end.
- Then, wrap the wide end behind the narrow end from left to right.
- Continue to wrap the wide end over the front, from right to left.
- Hold the horizontal band you’ve just created in place with your finger and pass the tie’s wide end beneath the loop around your collar.
- Allow the wide end to dangle in front of the knot after flipping it down. Continue to keep the band in place with your finger.
- Wrap the wide end from right to left behind the knot and then from left to right around the front of the knot. Place your finger under the horizontal band you just made.
- From beneath, pass the wide end through the loop around your collar.
- Finally, pass the wide end through the horizontal band, cinch it up, and adjust the knot’s corners out into an equal shape.
FAQs
1. What are the accessories you require when using a necktie?
Tie accessories can be used by both men and women to improve both function and fashion of the tie. People may pick from a variety of tie accessories to keep ties in place while also adding a touch of elegance. These selections are ideal for anyone looking to develop a signature style. The accessories available are:
- Tie bar: This is a bar that slides across the centre of the tie to hold it in place.
- A tie clip: This accessory clips the tie into place and attaches to the same spot.
- Tie tacks: These accessories have a pin, a base, and a chain to restrict the tie from moving.
- A tie chain: Like the others mentioned on this list, the tie chain is used to keep the tie in place. It has a bar and chain combination design.
- Tie strap: A tie strap attaches to shirt buttons by slipping through the label on the back of the tie.
2. What is the difference between a necktie and a bowtie?
| Parameters of Comparison | Neckties | Bowties |
| Length | Are long and reach anywhere between mid-chest to waist length | Are round and tied only across the neck |
| Popularity | They are much more popular | These are less prefered |
| Formality | These are less formal when compared to bowties and thus are used less. | These are more formal and are typically worn with tuxedos. |
| Environment | These are used for casual ceremonies! | They are mostly preferred for most formal meetings and official ceremonies |
| Worn with | Are worn with suits and formal dresses | Can be worn with formals as well as informal attire |
3. What is the proper way to tie a bowtie?
Step by step instructions to tie a bowtie

- Pull your collar up and put a bow tie around your neck. One side should be 4-5 inches shorter than the other.
- Cross the longer end above the shorter one.
- Make a half knot, similar to tying shoelaces and place your finger on it to keep the knot firm.
- Then, fold the bow tie’s shorter end in half.
- Pull the longer end of the bow tie over the half-folded bow tie and fold the unfurled portion of the bow tie in half.
- Pass the bow tie through the loop at the rear of the bow, much like you would when tying shoelaces.
- Pull tightly on both sides of the bow and place your index fingers through each of the loops. Then, pull the ends outwards.
- Tug and pull the ends to ensure the bow tie is securely fastened.
- Finally, centre in between your collars, and your bowtie is now ready.
4. Can you sew a tie for children?
Yes, you can easily sew a small tie for your young one. Look at the instructions given below to do so.
tieShare with your friends


