
Even the most eye – catching origami masterpieces use the simplest folds. Each fold has its own label and form in this japanese traditional arts. In a multitude of ways, innovators meld these folds to craft paper creatures, cups, and structures.
The word origami comes from the Japanese words ori and kami, which mean “folding” and “paper.” Origami is a Japanese art technique that involves making an object out of a single flat sheet of paper without the use of glue, cuts, or marks. If you’re new to the art of paper folding, many of the diverse origami terminology you come across can be pretty confusing. Thus, to start folding simple origami models, you’ll need to understand some basic folds.
Furthermore, the variety of origami folds and models available ranges from the mountain fold to the valley fold, from simple origami to advanced designs, from the crane to the butterfly. For a simple and quick picks for the best origami folds and models for kids and adults, keep on reading.
Different Origami Fold You Must Know!
The Mountain and Valley Folds are the most common folds in origami for beginners. Pretty much every single fold may well be a valley, a mountain, or a combination of these elements. Although the difference between the valley and mountain folds may not appear to be significant, it can have a major effect on your origami’s output. If you fold the paper correctly, it will “move” into place on its own.
Mountain Fold
On a level surface, lay the origami paper. The best possible platform is a table. Fold the paper using both thumbs and fingers at the ends of the crease you want to form to create a ridge.
From the back of the paper, press the fold in. Like a mountain, this raises the fold. The crease should be smoothed out now. Thus, the reverse (or mountain) fold is now complete.
Valley Fold
On a level surface, lay the origami paper. Fold the paper’s lower border upwards; the fold spot could also be anywhere for the time being. Hold the fold in place with one hand only. Also, form a neat crease with your other hand along the fold line. That’s it; a valley fold has been created.
Squash Fold
After learning how to produce the valley and mountain folds, the beginner origami fan must learn how to make the squash fold. The squash fold is a simple method for “squashing” your paper into place. It’s also a compound fold, which is a group of creases that are all done at the same moment. Compress it into the shape shown using your instructions as a guide. From a center point, two layers of paper emerge.
Other Notable Origami Folds
Below are among the most common folds, along with sequential instructions on how to make them. These folds may not always seem exactly the same as they do in these instances when folding other models.
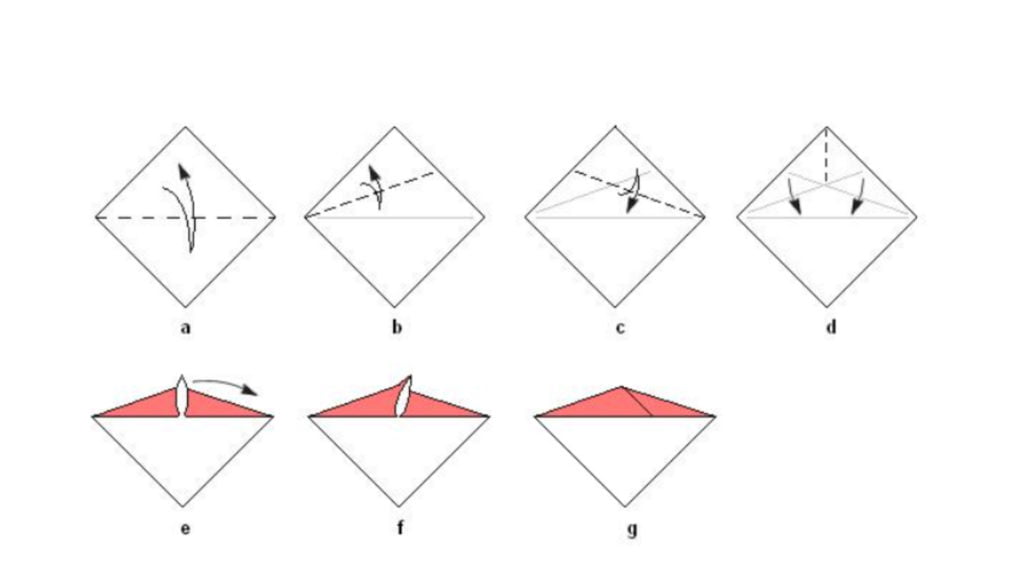
The fold seems to get its owing to the fact that it forms a paper flap that makes it look like a rabbit’s ear.
Rabbit Ear Fold
- Fold the left side of a square sheet of paper to the right, then unfold it like a diamond.
- Fold in half and then open out.
- The bottom left edge should be folded to the middle crease and then unfolded.
- Fold the lower right corner edge to the mid fold to open the piece.
- Bring both lower edges to the centre and fold the dangling triangular flap in the centre to the side using the diagonal creases you just produced.
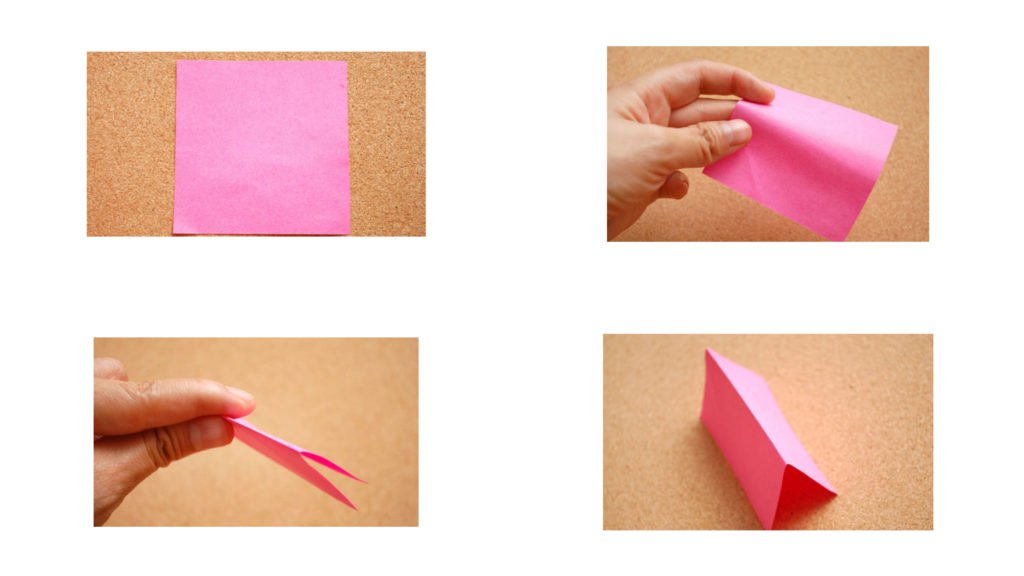
Pleat
To pleat the paper, the origami pleat fold incorporates both a valley and a mountain fold.
- Let’s begin with a folded piece of paper.
- Before folding the rest of the left side back, fold a segment of the top left to the right.
- When viewed from the side, the fold resembles a letter Z.
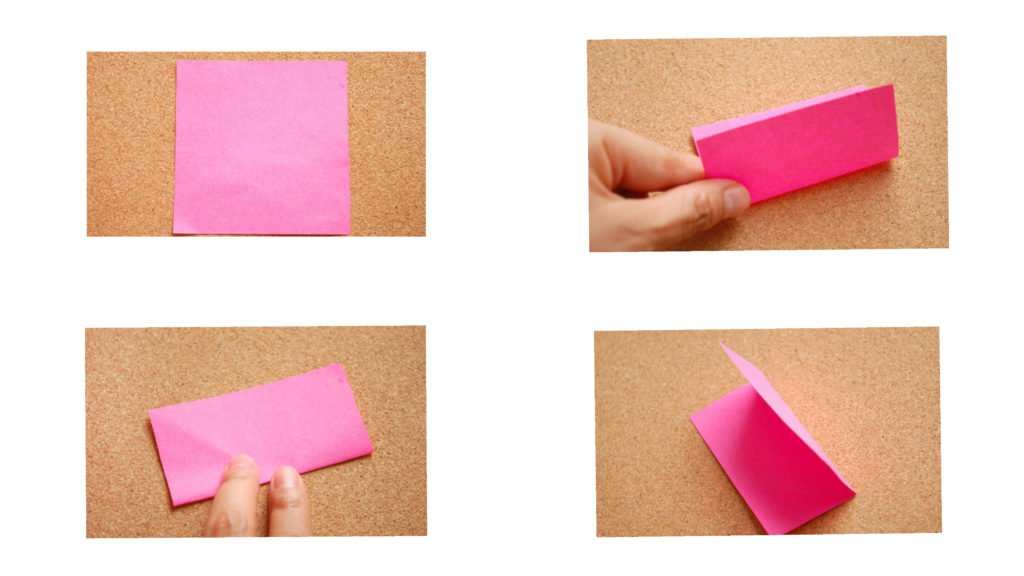
Crimp
From the exterior of the paper, this pleat is similar to an Outside Reverse Fold.
- Let’s make a sequence of pre-creases to help in crimping.
- From right to left, fold a part of the paper in half.
- Fold at an angle from the top of the crease to the bottom, then unfold.
- Open the paper and flip the right side into the left using the creases as a guide.
Tips for origami? Watch this
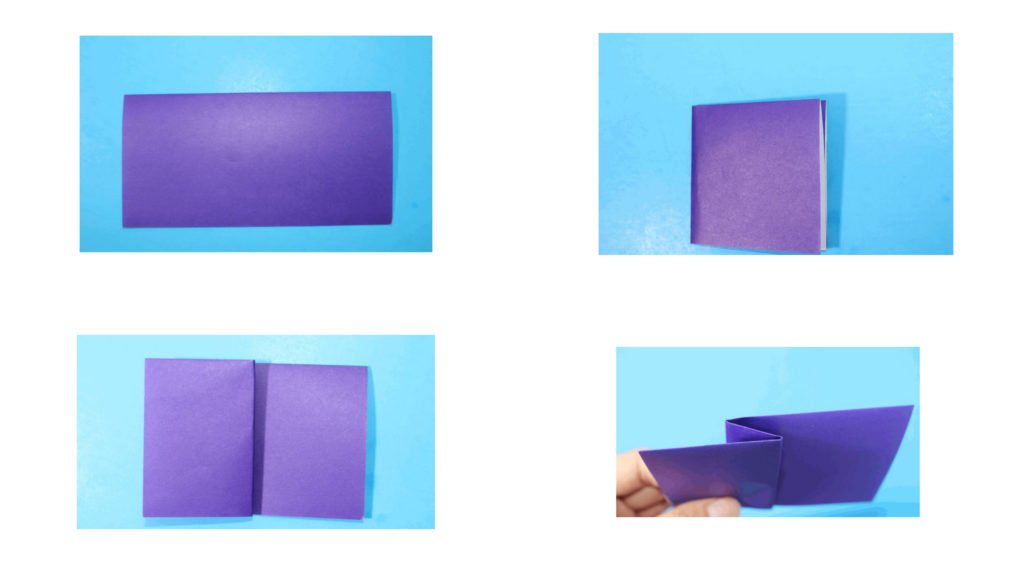
Petal Fold
Whenever crafting origami flowers, the petal fold seems to be very popular. It’s not difficult, but it could be tricky for beginners.
- Normally, you’d have to execute a series of folds before getting to this stage with the petal fold. Fold a square base first if you simply want to practice.
- Fold the right and left sides to the center crease to begin. Crease thoroughly before unfolding.
- Rip open the paper to make the third crease. The third fold must join the other two. If you did a good job creasing in Step 2, you should be able to see the other two creases easily. If otherwise, go back to Step 2 and work on your crease.
- As a response, fold the top flap of the paper downward to reach the other two creases. At this stage, we’ll join the two opposing sides of the paper at the midpoint. If you re-crease or pinch the creases, it will assist.
Final Thoughts
Beyond birds and boats, origami has grown and changed. There are many different types of origami currently. Origami fans come up with about “80” new varieties of origami in a recent informal study. It is possible to make very complicated figures such as cranes, frogs, sunglasses, and more without using any more techniques except creasing and folding paper!
The greatest approach to learn how to fold origami is to practice as much as possible. You can now begin making simple origami crafts once you have a better understanding of the fundamentals of folding.
Therefore, consider enrolling in Podium School’s origami classes to learn more about the wonders of origami!
Stay up to date on our site for more updates, and don’t miss our most recent article, 10 Fantastic Audiobooks for Children Ages 6 to 12!
Share with your friends


