
MS Word has become an important and must-know skill these days. It was initially released in 1983 under the name Multi-Tool Word. No matter if you are in school, college, or the corporate world, you will need it everywhere. It is a very simple processing software and very helpful as well. It is one of the best software that Microsoft developed. MS is the best choice when it comes to typing long content and supporting it with various multimedia. You can use it to make assignments, files, and use it for many other documentation purposes. Nowadays in school and college, a lot of assignments are given for which students need to work on this software.
So, it has become really important to know how to work on it. And at least know its basics if you are not a pro. It is very easy to share and edit a word document, which is why one can easily work on it. Podium School has brought some must know basics of MS Word. By knowing these your kid can easily start working on it.
Basics of MS Word for Kids:
How To Start With it
To start working on it you first need to know how to reach it and open it. For that, you need to go to the desktop of your laptop. Then type Word in the search bar at the bottom of the screen. Then a page will open up with a tab named ‘New’. In that, you will be able to see the plain white Word document. Click on it and then a blank page will appear on your screen. Then you can easily start writing the content on it. MS Word not only offers you a plain white templet but also a lot of other types of templets on which you can start working. Ex- Grey Black Resume, Calander, Brochure, Scrapbook, etc.
How To Write and Edit Text
Once you have opened a blank page. Then all you need to do is start writing on it. For that, you need no to do anything and simply start writing. You can write as much content you want. And then it’s time to edit it by aligning it, giving more emphasis to important terms, adding bullets, and so on. For that, you will have to begin with selecting the text that you want to edit and click on Home, in the top bar. Then you will be able to see text font, size, alignment, Bold, Italic and underline. And a bar for adding bullets and numbers adjacent to that. You can select bullets according to your requirements. In official work usually font named Times, New Roman in size 12 is used.

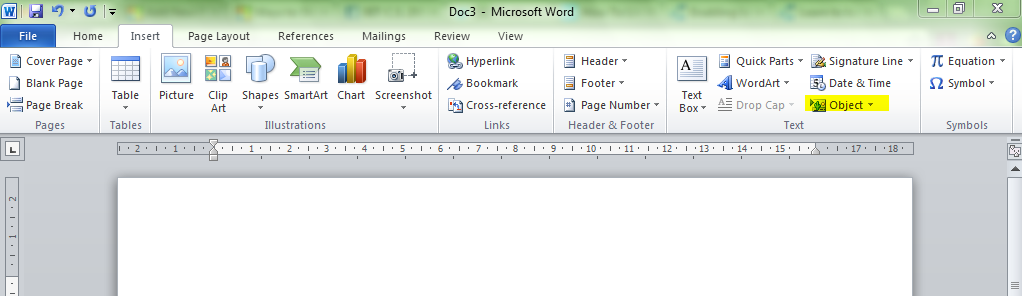
Adding Multi Media to Document
In simple words, Multi-Media is anything apart from the text. It can be graphs, images, pictures, shapes, tables, or any other thing. One can not explain everything through text so multimedia helps in supporting text. It enables you to make your work look more presentable. To insert any type of multimedia you need to click on the ‘Insert’ tab adjacent to the ‘Home’ tab. Once you click on that you’ll be able to see Table, Picture, Shapes, Icons, 3D Models, Smart Chart, Chart, and Screenshot. If you want to insert an image then click on pictures, then on this device. You can choose any picture saved on your device and insert it. Likewise, if you want to draw a graph, table, or shape then you will have to select accordingly.
You can easily arrange and align your multi-media according to your need. You can also add page numbers to your file by clicking on a tab named ‘Page Number’.
How to Set Layout
Layouting your Word document is really important. Because if it is not arranged properly or things are just placed randomly. Then it will look shabby and difficult to understand. You will have to layout your document if you want to make it look more clear and understandable. For that click on the ‘Layout’ tab in the top bar. Once you click on that you will be able to see a tab named Margins, Orientation Size, and Columns. To set the margins of the page click on Margins. If you want to change the orientation of a page like a Portrait on Landscape the click on Orientation and select accordingly. By clicking on Size you can change the size of your sheet according to your need like A4, A5, tabloid, Letter, Legal, and so on. By clicking on Columns you will be able to divide your sheet into two or three columns.
How to Save or Print
Once you are done with all your writing and another editing. You need to save it or print it. Because you either send its softcopy to someone or hand over a hardcopy of it. To save your Word document you will have to click on the ‘File’ tab and then on the ‘Save As’ option. You can save it anywhere on your PC by selecting the place accordingly. For this, you can also use the shortcut key of ‘Ctrl+S’ and the tab will appear accordingly.
And if you want to print your page you need to follow the same thing, click on the ‘File’ tap and then on the Print option. Give all the instructions accordingly and click on Print. For printing your document you can also use the short key of ‘Ctrl+P’ and the tap will get open. If you want to convert it into a PDF click on print and then select Microsoft to PDF. It will be done.

Final Thoughts on Basics of MS Word
Ms. Word is of great use and can help you in different aspects of life. Once you learn these basics you will be able to start working on MS Word. Other than all these Microsoft Office offers you a lot of other features by which you can do your work even more easily. One of its best features is that you can listen to your text which makes finding mistakes much easier. If further gives you an option to add a header and footer. Word is one of the best platforms to document your work, present it in a good way and share it with others. So, start your MS Word journey by using these basics. Know about more such guides on Podium Blog!


