- Introduction to Shilpkar
- What is Shilpkar clay?
- How to use Shilpkar clay
- Art wall hanging
- Clay Peacock:
- Clay Jewelry
- Shilpkar Clay bottle decoration
- Canvas Art
- Vase Decoration
- Clay Fridge Magnets
- Shilpkar Clay Frog pen holder
- Shilpkar Clay Mirror
- What is the cost of Shilpkar Clay?
- Is Shilpkar Air Dry?
- How do I add color to Shilpkar?
- How can we make Lippan Art by using Shilpkar?
- Motivate to Create!
- Frequently asked questions:-
- Is Shilpkar Clay air dry?
- How much time it takes for Shilpkar to dry?
- Why should we use talcum powder while working with Shilpkar Clay?
- Why should we not leave Shilpkar in air without package?
- What is the cost of Shilpkar?
- Is Shilpkar costly?
- Is Shilpkar harmful for the skin of Children?
- Is Shilpkar Clay waterproof?
Modelling clays have been witnessed for use in sculptures. This is due to their qualities like malleability and non-drying attributes. Since ages, natural clays and waxes are used in sculpture. Moreover, it is used in commercial modelling materials have been in use. Plasticine was formulated in 1897 in England. This was done in view of sculpture students to produce a non-drying clay for their use.
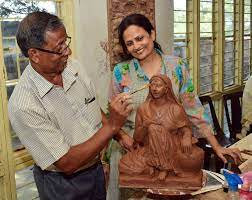
Clay has been used to make art for centuries, both functional and decorative. Wet clay, etc. are commonly used by artists in different kinds of art. However, working with wet clay becomes difficult for beginner and for people who are not experts. Children find it really difficult to learn as beginners or to show in their creativity in clay modelling as a hobby.
Introduction to Shilpkar
It is rightly said, anything is only created if and only if someone feels that it is needed. In today’s world we get Shilpkar clays that serves the purpose. Shilpkar is a great product to work with. The best thing is it’s self-hardening quality. Moreover, it is extremely durable. It requires no firing. Moreover, it has a self-curing feature. In a short span of time, it turns into a hard and durable state. Hence, it proves to be far more better and developed than regular wet clay. This is not affected by water and does not shrink in size, like regular clay.
The most wonderful part is that these can be painted or varnished with all types of acrylic colors. These colors can be added to these compounds by mixing a few drops of color while kneading the dough. These are extremely safe and a lot easier to use. Thus, it can easily be used with bare hands. Also, they can be cleaned using soap and water.
What is Shilpkar clay?
Shilpkar clay is purely used as a modeling compound by artists and it serves the same purpose as polymer clay, which is extensively used in making miniature models, sculpted dolls, figurines, theatre props and sets, costume pieces, jewelry, etc. Since it is easily pliable, it can be used to mould and create amazing shapes for 3D works of art.
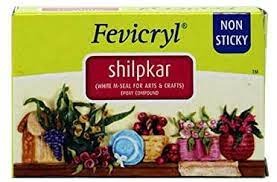
Shilpkar clay dries within a short duration of time. It takes approximately 90-120 minutes to dry. It is eco-friendly, easy to use and color can be easily added to it. Moreover, it is durable and hygienic.
Clay modelling is an art practiced since ages. In present times, people make it as a hobby to learn and nurture. Shilpkar clay is also used by adults and children for various purposes. There are various things that can be made by Shilpkar Clays.
How to use Shilpkar clay
From the the Shilpkar package, cut two equal pieces from Shilpkar Resin Base and Hardener. Mix them to form an even dough. Do not mix the Resin Base and Hardener in wrong proportions.
Because this will result in improper curing and hardening. You should read the instructions mentioned on the pack properly before kneading the dough.
Art wall hanging
Materials required for a clay art Wall Hanging :
- MDF board
- Shilpkar clay
- Colors (acrylic)
- Scissor
- Talcum powder
- Varnish

Process of DIY clay art Wall Hanging :
Steps for the art wall hanging:
- Take the MDF Board with size as per your comfort.
- Draw a beautiful design on it as per you.
- Take Shilpkar/clay of your choice . Make dough in correct proportion. Read the instructions on the Shilpkar package properly .
- With help of hand or roller make clay ropes .
- Now time cover the designs with thin clay ropes . Take help of Talcum powder to shape and scissors to cut where required.
- Let the design dry completely for a whole day.
- After the design has dried. Color the board with Acrylic white color .
- Let the board dry again.
- Now time to color the designed board as per your choice .
- Highlight the clay lines with acrylic white .
- We need to apply two coats of varnish for keeping the colors in tact .
- Finally decorate with mirrors. Add the mirrors to board with help of fevicol glue.
- There is no requirement of framing. It is already with varnish ( After coloring)
- There are many more designs you can try.
Shilpkar clay is used to create a variety of things. Individuals or groups can use Shilpkar clay to explore their creativity and a variety of different art, drawings and crafts. Young children can indulge themselves in such activities to learn and develop creativity in a fun way. You can also develop it as a hobby.
Clay Peacock:
Materials required for a clay Peacock :
- Shilpkar clay
- Colors ( acrylic)
- Scissor
- Talcum Powder .
- Varnish
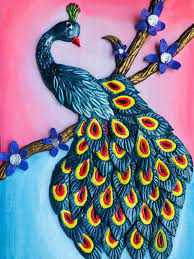
Process of DIY clay Peacock :
Steps for the clay peacock:
- Make clay dough / Shilpkar.
- Mix the resin base and hardener in the right way.
- This will prevent cracks.
- Take small balls of equal size from dough to make petals /feather .
- Make petals or similar shapes.
- Take help of talcum Powder to shape them .
- Make one big sized Petal .
- Take some more clay.
- Shape the body of peacock with help of talcum powder and hand.
- Apply fevicol on the body of peacock .
- You should stick all the petals or feathers properly.
- Take care that the tail feather is little bigger.
- Now, decorate the peacock with clay designs.
- You can add clay coils on the body of the peacock.
- This will enhance it’s look.
- Make eyes of the peacock. Add other accessories.
- You brush the art with little water to give smooth look.
- Let the peacock dry for whole day.
- Color the peacock with acrylic colors. Use metallic blue, metallic green , golden colors.
- While coloring give special attention to the feathers .
- Our peacock is ready.
Shilpkar clay is used to create a variety of things. Individuals or groups can use Shilpkar clay to explore their creativity and a variety of different art, drawings and crafts. Young children can indulge themselves in such activities to learn and develop creativity in a fun way. You can also develop it as a hobby.
Clay Jewelry
Materials required for a clay Jewelry :
- Shilpkar clay
- Colors (acrylic)
- Scissor
- Talcum powder
- Varnish
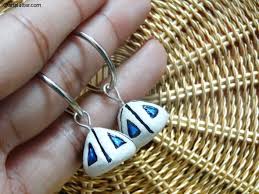
Process of DIY clay Jewelry :
Steps for the clay jewelry:
- We start with mixing resin and hardener.
- Mix the dough till you get even color.
- Now start rolling thin coils from the dough.
- Wrap them over the balls in a conical fashion as shown in the image.
- Insert loops at the ends. Make half domes of Jhumkas.
- Similarly make two tear drop shaped coils for the stud.
- You should stick a stud jewelry extension from behind.
- Do this to the wet clay not to the dry clay.
- Let it dry properly.
- Paint the jewelry.
- The tear drop shape coils with Pearl Metallic gold acrylic colors.
- This will enhance it’s beauty.
- Pass the Golden hoop through the loop in the Jhumkas.
- Make small clay flowers from the remaining dough.
- Stick the flowers on the metal loop. Then let it dry.
- I have painted the flowers with pearl white colors.
- You can choose your design and customize it as per you.
- Wait for the paint colors to dry.
- Then, stick different kind of pearls along the periphery of the Jhumkas.
- Also, stick pearls in the center of flower on the Jhumka.
- Now bring it all together.
- Your pretty jewelry is ready.
Shilpkar clay is used to create a variety of things. Individuals or groups can use Shilpkar clay to explore their creativity and a variety of different art, drawings and crafts. Young children can indulge themselves in such activities to learn and develop creativity in a fun way. You can also develop it as a hobby.
Shilpkar Clay bottle decoration
Materials required for a bottle art :
- Shilpkar clay
- Colors (acrylic)
- Scissor
- Talcum powder
- Varnish
- Fevicol
- Tissue
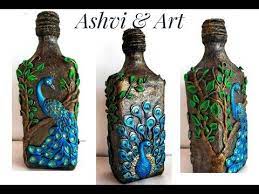
Process of DIY bottle art :
Steps for the bottle art:
- Mix water and fevicol in a bowl.
- Crush the tissue paper very lightly.
- Cover the bottle with crushed tissue paper.
- Cover with tissue paper using glue.
- Take a bottle of white acrylic paint.
- Take a piece of foam or sponge.
- Paint the bottle using the foam or the sponge.
- Now, take different acrylic colors.
- Make the color combinations of your own.
- Make clay balls and clay ropes.
- Give the clay balls the shape as per you.
- Proceed further as per your design.
- Use talcum to give shapes easily.
- Your customized bottle art is ready.
Shilpkar clay is used to create a variety of things. Individuals or groups can use Shilpkar clay to explore their creativity and a variety of different art, drawings and crafts. Young children can indulge themselves in such activities to learn and develop creativity in a fun way. You can also develop it as a hobby.
Canvas Art
Materials required for a canvas art :
- Shilpkar clay
- Colors (acrylic)
- Scissor
- Talcum powder
- Varnish
- Canvas
- Pencil and other basic stationary
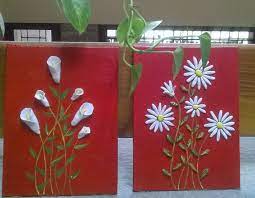
Process of DIY Shilpkar canvas art :
Steps for the Shilpkar canvas art:
- Take the canvas and choose a design/drawing that you like.
- Now, with the help of a pencil draw the design on the canvas.
- Once the drawing is complete, take the Shilpkar clay.
- Mix the Shilpkar clay in right proportion.
- Make balls and ropes of the Shilpkar as per your choice.
- Now, mould the balls into the shapes as par your design/drawing.
- Use talcum powder for making the shapes easily.
- Cover the canvas with the ropes and shapes you made.
- Use glue to stick the shapes on the canvas.
- Let it dry completely.
- Paint the Shilpkar design and the canvas with beautiful paints.
- Let it dry nicely.
- Decorate it with mirrors, pearls, etc.
- Your beautiful canvas is ready.
Shilpkar clay is used to create a variety of things. Individuals or groups can use Shilpkar clay to explore their creativity and a variety of different art, drawings and crafts. Young children can indulge themselves in such activities to learn and develop creativity in a fun way. You can also develop it as a hobby.
Vase Decoration
Materials required for Shilpkar Vase decoration :
- Shilpkar clay
- Colors (acrylic)
- Scissor
- Talcum powder
- Varnish
- Vase
- Pencil and other basic stationary
- Small decorative items
- Fevicol
- Toothpick or small stick
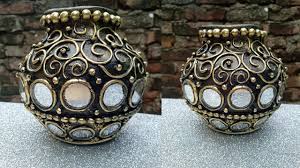
Process of Shilpkar Vase decoration:
Steps for the Shilpkar Vase Decoration:
- We start with mixing resin and hardener.
- Mix the dough till you get even color.
- Now start rolling thin coils from the dough.
- Wrap them over the balls in a conical fashion as shown in the image.
- Paint the vase with the color of your choice.
- Let the paint dry completely.
- Choose the designs of the flower that you want to make.
- Now, make the flowers and leaves as you have selected.
- Take a toothpick or a small stick.
- With a stick, give the leaves the required design.
- Do this to the wet clay not to the dry clay.
- Let it dry properly.
- Stick the dried flowers and leaves accordingly.
- Do this with the help of a fevicol.
- Now, use beautiful acrylic colors to paint the same.
- This will enhance it’s beauty.
- Let the paint dry completely.
- Take small decorative items as per your taste.
- Stick the decorative items as per your choice.
- You can choose your design and customize the vase as per you.
- Now bring it all together.
- Your pretty vase is ready to go with flowers.
Shilpkar clay is used to create a variety of things. Individuals or groups can use Shilpkar clay to explore their creativity and a variety of different art, drawings and crafts. Young children can indulge themselves in such activities to learn and develop creativity in a fun way. You can also develop it as a hobby.
Clay Fridge Magnets
Materials required for Shilpkar Clay Fridge Magnet :
- Shilpkar clay
- Colors (acrylic)
- Scissor
- Talcum powder
- Varnish
- Few magnets
- Pencil and other basic stationary
- Small decorative items
- Fevicol
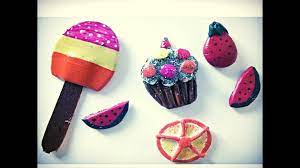
Process of Shilpkar Clay Fridge Magnets:
Steps for the Shilpkar Clay Fridge Magnets:
- We start with mixing resin and hardener.
- Mix the dough till you get even color.
- Now start rolling thin coils from the dough.
- Wrap them over the balls in a conical fashion as shown in the image.
- Choose the designs and the shapes that you want to make.
- Take the dough of Shilpkar and make the base as per the selected shape.
- Let the base dry a little.
- Do not let it completely dry otherwise the other shapes will not stick to the base.
- Now make the other shapes with Shilpkar as per the selected design.
- Do this to the wet clay not to the dry clay.
- Stick the shapes or the flowers to the base made earlier.
- Do this with the help of a fevicol.
- Let it dry properly.
- Now, use beautiful acrylic colors to paint the same.
- This will enhance it’s beauty.
- Let the paint dry completely.
- Take small decorative items as per your taste.
- Stick the decorative items as per your choice.
- You can also make frames and stick photographs to it.
- You can choose your design and customize the vase as per you.
- Now bring it all together.
- Your creativity and memories will be reflected on the fridge.
Shilpkar clay is used to create a variety of things. Individuals or groups can use Shilpkar clay to explore their creativity and a variety of different art, drawings and crafts. Young children can indulge themselves in such activities to learn and develop creativity in a fun way. You can also develop it as a hobby.
Shilpkar Clay Frog pen holder
Materials required for Shilpkar Clay Frog pen holder :
- Shilpkar clay
- Colors (acrylic)
- Scissor
- Talcum powder
- Paint brush
- Varnish
- Pencil and other basic stationary
- Small decorative items
- Fevicol
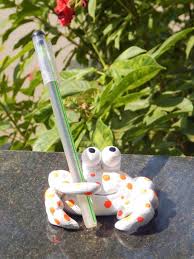
Process of Shilpkar Clay Frog pen holder:
Steps for the Shilpkar Clay Frog pen holder:
- We start with mixing resin and hardener.
- Mix the dough till you get even color.
- Now start rolling thin coils from the dough.
- Wrap them over the balls in a conical fashion as shown in the image.
- Choose the designs and the shapes that you want to make.
- Take the dough of Shilpkar and make the base as per the selected shape.
- Let the base dry a little.
- Do not let it completely dry otherwise the other shapes will not stick to the base.
- Now make the eyes and limbs with Shilpkar as per the selected design.
- Do this to the wet clay not to the dry clay.
- Stick the eyes, limbs and legs to the base made earlier.
- Do this with the help of a fevicol.
- Let it dry properly.
- Now, use beautiful acrylic colors to paint the same.
- This will enhance it’s beauty.
- Let the paint dry completely.
- Make polka dots with yellow colors.
- Take small decorative items as per your taste.
- Stick the decorative items as per your choice.
- Now place a pen in the limbs of the frog.
- You can choose your design and customize the pen holder as per you.
- Now bring it all together.
- Your creativity will always be on your table.
Shilpkar clay is used to create a variety of things. Individuals or groups can use Shilpkar clay to explore their creativity and a variety of different art, drawings and crafts. Young children can indulge themselves in such activities to learn and develop creativity in a fun way. You can also develop it as a hobby.
Shilpkar Clay Mirror
Materials required for Shilpkar Clay mirror :
- Shilpkar clay
- Colors (acrylic)
- Scissor
- Talcum powder
- Paint brush
- Varnish
- Round shape mirror
- Toothpick or stick
- Pencil and other basic stationary
- Small decorative items
- Fevicol
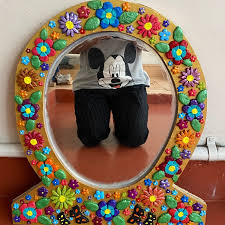
Process of Shilpkar Clay Mirror:
Steps for the Shilpkar Clay Mirror:
Steps for making the shapes with Shilpkar-
- We start with mixing resin and hardener.
- Mix the dough till you get even color.
- Now start rolling thin coils from the dough.
- Wrap them over the balls in a conical fashion as shown in the image.
- Choose the designs and the shapes that you want to make.
- Take the dough of Shilpkar and make the base as per the selected shape.
- Let the base dry a little.
- Do not let it completely dry otherwise the other shapes will not stick to the base.
- Now make the butterflies and use stick or toothpick to make lines on the wings.
- Do this to the wet clay not to the dry clay.
- Now, make the flowers of different shapes and designs.
- Then, stick the flowers and butterflies and whatever shape you have made on the base of the mirror.
- Do this with the help of a fevicol.
- Leave a round space on the base of the mirror, as per the size of the mirror.
- Do not stick any flower, butterfly or any shape on the left space.
- Stick the mirror on the left space with the help of fevicol.
Steps to paint and give a finishing touch to the mirror-
- Let it dry properly.
- Now, use beautiful acrylic colors to paint the same.
- This will enhance it’s beauty.
- Let the paint dry completely.
- Make use of aesthetic colors to make it look simple and beautiful .
- Take small decorative items as per your taste.
- Stick the decorative items as per your choice.
- Now place a Shilpkar mirror in the vanity of your room.
- You can choose your design and customize the Shilpkar mirror as per you.
- Now bring it all together.
- Your creativity will always enhance the beauty of your room.
Shilpkar clay is used to create a variety of things. Individuals or groups can use Shilpkar clay to explore their creativity and a variety of different art, drawings and crafts. Young children can indulge themselves in such activities to learn and develop creativity in a fun way. You can also develop it as a hobby.
What is the cost of Shilpkar Clay?
Shilpkar is very economical for practicing art and pursuing hobbies. The 50 gm pack of Shilpkar clay is of rupees 20 ( Inclusive all the taxes ). The pack consists of 25 gm hardener and 25 gm resin. Both the hardener and the resin is equally mixed for correct results. If we see the price of even simple articles created by clay modelling, it is at least five times the price of this Shilpkar.
So, the price of the Shilpkar is really nominal and fits in almost everybody’s budget. Nowadays, a small packet of chips and a small chocolate is of the same price. Therefore, now we can explore our creativity to a greater extent with putting heavy burdens on our pocket.
Is Shilpkar Air Dry?
The best thing about Shilpkar is that it is air dry. It takes 24 hours for complete drying. This property of Shilpkar of air drying makes it easy to use. So, without extra hustle, it is handy to use and shape.
How do I add color to Shilpkar?
Adding color to Shilpkar is quite an easy task. First, take equal amount of hardener and resin from the pack. Mix and knead them well. Now, from this mixture take the amount of dough in which the specific color you want to add. Then, take the acrylic color bottle of the color that you want to add. Now, with a toothpick or a stick, add the right quantity of color to get the desired result. Then, mix the color well in the dough. Gently, use your fingers to knead the dough to obtain the color that you want. Now, the colored Shilpkar is ready to work with. So, add different colors and explore your creativity by combining different colors.
How can we make Lippan Art by using Shilpkar?
Lippan art is an art originating from Gujrat, India. It is a form of Clay art. Earlier, it was done mostly by the women of Kutch. The purpose of doing this was to decorate their homes. They used to mix mud and cow dung for this purpose, traditionally. That was quite a hectic process.
But the use of Shilpkar has made the Lippan art much easier. So, for making the Lippan art there are certain steps to follow. Take a cardboard, pen / pencil, some acrylic colors, tiny mirrors and some decorative items. Now, first choose the design that you want to make. With the help of pen / pencil draw the same on the cardboard. You can choose any design of your choice. Now, make use of Shilpkar in different shapes to cover the design as per your choice. Let it dry completely.
Paint the art as per choice. Again, let it completely dry. Now, with the help of fevicol stick the mirrors and the decorative items as per your choice. Your beautiful Lippan art is ready. You can explore various other designs and combinations.
Motivate to Create!
We should encourage our children in this time of pandemic to practice a productive and creative hobby. This will keep them busy and away from wrong use of smartphones. Teachers should organize such activities between their academics and learn in a fun way.
Art teachers can make the children learn different designs, sculptures, etc. to enhance their creativity and imagination. Parents should also work with their children to help them, encourage them and to spend quality time with them.
So, browse the internet and take different ideas, learn the steps and get the materials and get ready to work. Let us turn our creative imaginations into beautiful creations and art work. Let us explore our talents with a happy distraction. Decorate your room with beautiful creations of your own.
Frequently asked questions:-
Is Shilpkar Clay air dry?
Yes. It has a self hardening property. The air- dry property makes it easy and handy to use.
How much time it takes for Shilpkar to dry?
Shilpkar Clay takes 24 hours to completely dry. This is not much time if we compare to the mud clay that was used earlier. It used to take few days or even a week to dry completely. And this could only happen if and only if there was a proper sunlight or the wind blowing rightly. But the Shilpkar is much easier to use. This makes exploring Lippan art much easier these days.
Why should we use talcum powder while working with Shilpkar Clay?
The simple reason to use talcum powder is that it will make your work much easier. It does not allow the platform we are working on as well as our hands to be sticky with the Shilpkar which will make our work tedious, ruin our shapes and prevent the desired outcome. Hence, using talcum powder will help you to work easily and effectively. Therefore, do not forget to use talcum powder.
Why should we not leave Shilpkar in air without package?
One of the best thing about Shilpkar is air drying. That is, it dosen’t necessarily need any amount of sunlight for drying purpose. This quality prevents it from leaving outside in air. Since, Shilpkar is air dry therefore, it cannot be left outside. If we leave it outside, it will harden and we will no longer be able to use it.
What is the cost of Shilpkar?
The 50 gm pack of Shilpkar clay is of rupees 20 ( Inclusive all the taxes ). The pack consists of 25 gm hardener and 25 gm resin.
Is Shilpkar costly?
No, it is very economical to use. It has a really economical to use.
Is Shilpkar harmful for the skin of Children?
No, Shilpkar Clay is not at all harmful for children’s skin. Children can use it for exploring there creativity without even making their hands and clothes dirty.
Is Shilpkar Clay waterproof?
Yes, Shilpkar Clay is water proof. Therefore, it cannot be ruined with water.
Share with your friends


